In this tutorial, you will build a PDI-enabled application step-by-step from a PDI-free base. You will end-up building the C version of the example provided with PDI for the the Trace, Decl'HDF5, and Pycall plugins. Additional examples are available for the other plugins.
PDI installation is documented in a dedicated page.
Once PDI is installed, you can proceed with getting the sources for the hands-on tutorial from github:
Before compilation, configure the tutorial by detecting all dependencies:
pdirun prefix is never required.Once you have correctly modified each exercise according to instructions, you can compile it by running:
Where ? is the number of the exercise.
You can run each exercise with the following command:
Where ? is the number of the exercise and 4 represents the number of MPI processes to use.
To store the logs for later comparison, you can use the following command (for example for ex2.):
Now you're ready to work, good luck!
Ex1. implements a simple heat equation solver using an explicit forward finite difference scheme parallelized with MPI. The code uses a block domain decomposition where each process holds a 2D block of data.
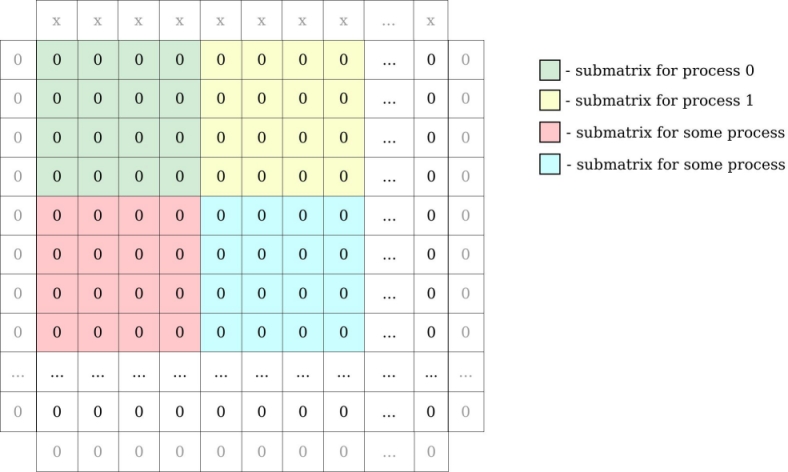
Locally, each process holds its local block of data with one additional element on each side for ghost zones.

In the following exercises however, PDI will only be used to decouple I/O operations. There is no need to fully dive in the core of the solver described in the PDI example algorithm and implemented in the iter and exchange functions.
The specification tree in the .yml files and the main function are the locations where all the I/O-related aspects will be handled and the only ones you will actually need to fully understand or modify.
This example gets its configuration from a file in the YAML format: ex1.yml file. If you're not familiar with YAML, please have a look at our quick YAML format documentation to understand it. The example uses the paraconf library to read this file.
ex1.yml.ex1.yml to be able to run the code with 4 MPI processes.Ex2. is the same code as that of ex1. with PDI calls added in main function. In our YAML file (ex2.yml), a new sub-tree has been added under the pdi key. This sub-tree is the PDI specification tree passed to PDI at initialization. Here, the PDI Trace plugin is used to trace PDI calls.
PDI_share and PDI_reclaim calls to match the output of ex2.log file (only the lines matching [Trace-plugin] have been kept). You only need to change the ex2.c file. You can easily check if the files are the same by running the command: In this exercise, the code is the same as in ex2. No need to touch the C code here, modification of the YAML file (ex3.yml) should be enough.
The Trace plugin (trace) was replaced by the Decl'HDF5 plugin (decl_hdf5) in the specification tree. In its configuration, the dsize variable is written.
psize and pcoord variables in addition to dsize to match the content expected as described in the ex3.h5dump text file (use the h5dump command to see the content of your HDF5 output file in the same format as the .h5dump file). You can easily check if the files are the same by running the command: To achieve this result, you will need to fill 2 sections in the YAML file.
data section to indicate to PDI the datatype type of the fields that are exposed.decl_hdf5 section for the configuration of the Decl'HDF5 plugin.ex3.h5 file before, otherwise the data will not be changed.In this exercise each MPI process will write its local 2D array block contained in the main_field variable to a separate HDF5 file. Once again, this can be done by modifying the YAML file only, no nee to touch the C file.
Look at the number of blocks, you will have to use the correct number of MPI ranks to run the example.
Notice that in the YAML file, a list was used in the decl_hdf5 section with multiple write blocks instead of a single one as before in order to write to multiple files.
Also notice that this example now runs in parallel with two processes. Therefore it uses "$-expressions" to specify the file names and ensure we do not write to the same file from distinct ranks.
Unlike the other fields manipulated until now, the type of main_field is not fully known, its size is dynamic. By moving other fields in the metadata section, you can reference them from "$-expressions" in the configuration file.
main_field.Unlike the other fields manipulated until now, main_field is exposed multiple times along execution. In order not to overwrite it every time it is exposed, you need to add a when condition to restrict its output.
main_field at the second iteration (when ii=1) and match the expected content as described in ex4.h5dump.In ex4., two variables were written to ex4-data*.h5, but the file was opened and closed for each and every write. Since Decl'HDF5 only sees the data appear one after the other, it does not keep the file open. Since ii and main_field are shared in an interlaced way, they are both available to PDI at the same time and could be written without opening the file twice. You have to use events for that, you will modify both the C and YAML file.
loop when both ii and main_field are shared. With the Trace plugin, check that the event is indeed triggered at the expected time as described in ex5.log (only the lines matching [Trace-plugin] have been kept).on_event mechanism to trigger the write of ii and main_field. This mechanism can be combined with a when directive, in that case the write is only executed when both mechanisms agree.main_field at iterations 1 and 2, in two distinct groups iter1 and iter2. Your output should match the content described in ex5.h5dump.As you can notice, the PDI code is quite redundant. In this exercise, you will use PDI_expose and PDI_multi_expose to simplify the code while keeping the exact same behaviour. For once, there is no need to modify the YAML file here, you only need to modify the C file in this exercise.
There are lots of matched PDI_share/PDI_reclaim in the code.
PDI_expose that is the exact equivalent of a PDI_share followed by a matching PDI_reclaim.This replacement is not possible for interlaced PDI_share/PDI_reclaim with events in the middle. This case is however handled by PDI_multi_expose call that exposes all data, then triggers an event and finally does all the reclaim in reverse order.
PDI_share/PDI_reclaim by PDI_exposes and PDI_multi_exposes and ensure that your code keeps the exact same behaviour by comparing its trace to ex6.log (only the lines matching [Trace-plugin] have been kept). You can easily check if the files are the same by running: In this exercise, you will only write a selection of the 2D array in memory excluding ghosts to the HDF5 file. Once again, you only need to modify the YAML file in this exercise, no need to touch the C file.
As you can notice, now the dataset is independently described in the file.
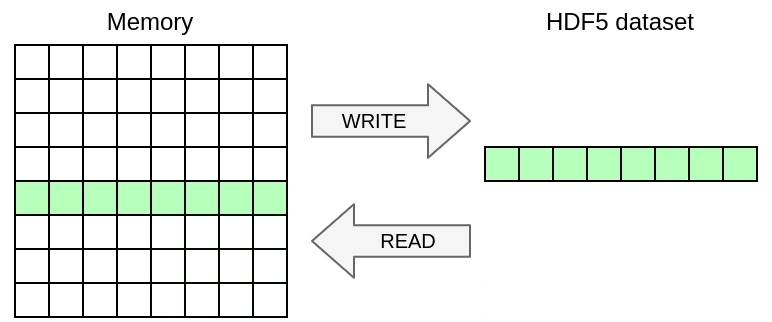
ex7.h5dump. You can easily check if the files are the same by running: You can achieve this by using the memory_selection directive that specifies the selection of data from memory to write.
In this exercise, you will once again change the YAML file to handle a selection in the dataset in addition to the selection in memory from the previous exercise. You will write the 2D array from the previous exercise as a slice of 3D dataset including a dimension for time. Once again, you only need to modify the YAML file in this exercise, no need to touch the C file.
Notice how the dataset is now extended with an additional dimension for three time-steps.
main_field at iterations 1 to 3 inclusive into slices at coordinate 0 to 2 of first dimension of the 3D dataset. Match the expected output described in ex8.h5dump. You can easily check if the files are the same by running: You can achieve this by using the dataset_selection directive that specifies the selection where to write in the file dataset.

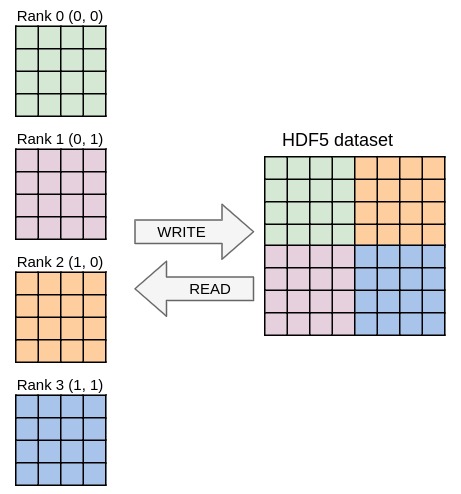
Running the code from the previous exercises in parallel should already work and yield one file per process containing the local data block. In this exercise you will write one single file with parallel HDF5 whose content should be independent from the number of processes used. Once again, you only need to modify the YAML file in this exercise, no need to touch the C file.
The mpi plugin was loaded to make sharing MPI communicators possible.
communicator directive of the Decl'HDF5 plugin to switch to parallel I/O and change the file name so that all processes access the same file.psize).pcoord).Match the output from ex9.h5dump, that should be independent from the number of processes used. You can easily check if the files are the same by running:
In this exercise, you will once again modify the YAML file only and use python to post-process the data in situ before writing it to HDF5. Here, you will write the square root of the raw data to HDF5 instead of the data itself.
Notice that the Decl'HDF5 configuration was simplified, no memory selection is applied, the when condition disappeared. The dataset name is however explicitly specified now because it does not match the PDI variable name anymore, you will instead write a new variable exposed from python.
The pycall section has been added to load the Pycall plugin. It executes the provided code when the "loop" event is triggered. The with section specifies the variables (parameters) to pass to Python as a set of "$-expressions". The provided code again exposes its result to PDI and multiple blocks can be chained this way.
with block to let the Python code process the data exposed in main_field.ex10.h5dump. You can easily check if the files are the same by running: .py file on the side.In this tutorial, you used the C API of PDI and from YAML, you used the Trace, Decl'HDF5, and Pycall plugins.
If you want to try PDI from another language (Fortran, python, ...) or if you want to experiment with other PDI plugins, have a look at the examples provided with PDI.